

-1.png "how to avoid all nighters (2)-1")
-1.png "toddler-behaviour-and-sleep")
-1.png "maternity-resources")
-1.png "how-to-ask-for-help")
-1.png "how-to-support-your-child-starting-school")
Adding Employees
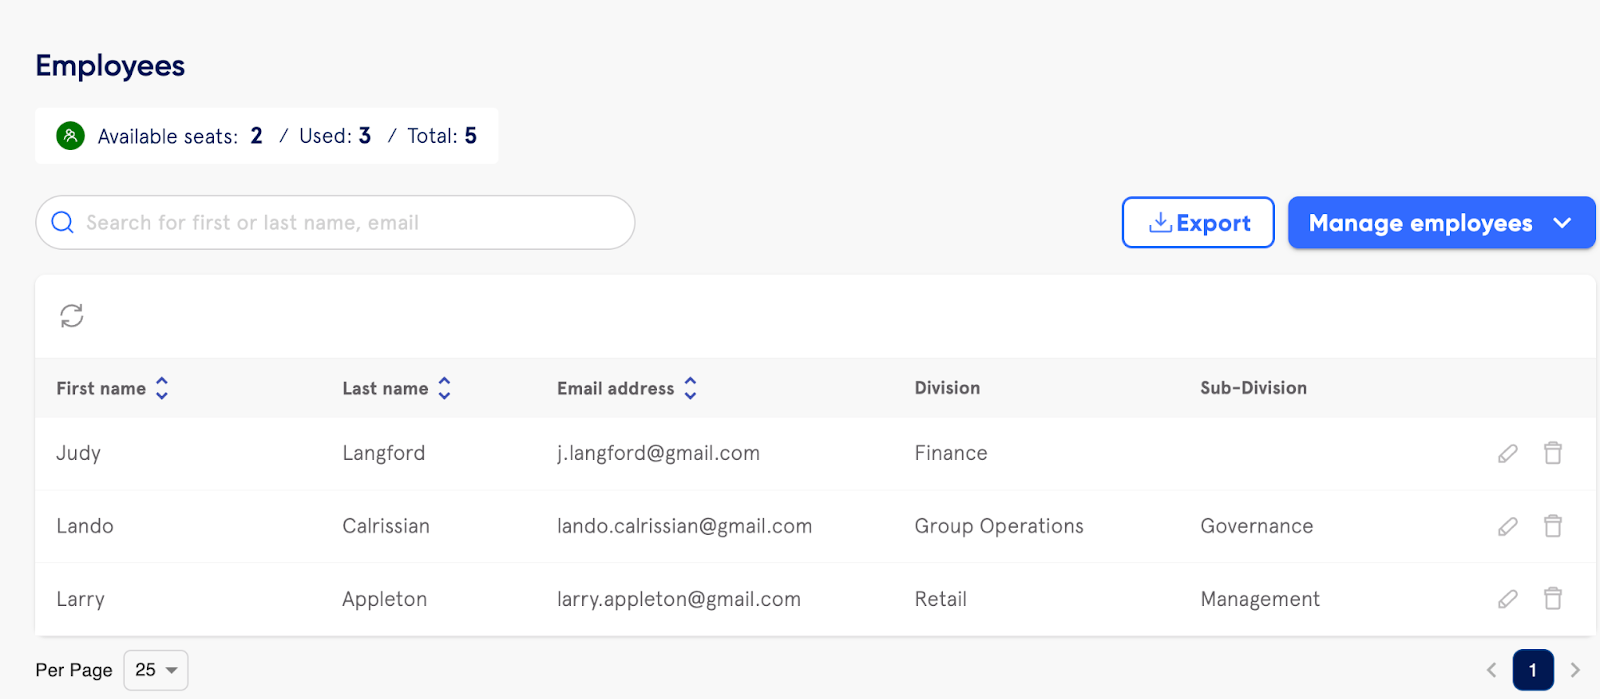
Employees can be provided with access to the Sonder service individually using ‘Add one employee’ or in bulk using ‘Bulk add employees’.
|
🤔 Checking your available seat count Prior to adding new employees, it is recommended to check how many Available Seats you have remaining. The Customer Portal will prevent you from exceeding the Total Seat count, and discard uploaded employee records greater than your allocation. If you feel that additional seats are required please contact your Customer Success Manager. |
Add one employee
To add a single employee select the ‘Add one employee’ option from the Manage Employees dropdown menu in the Employees area.
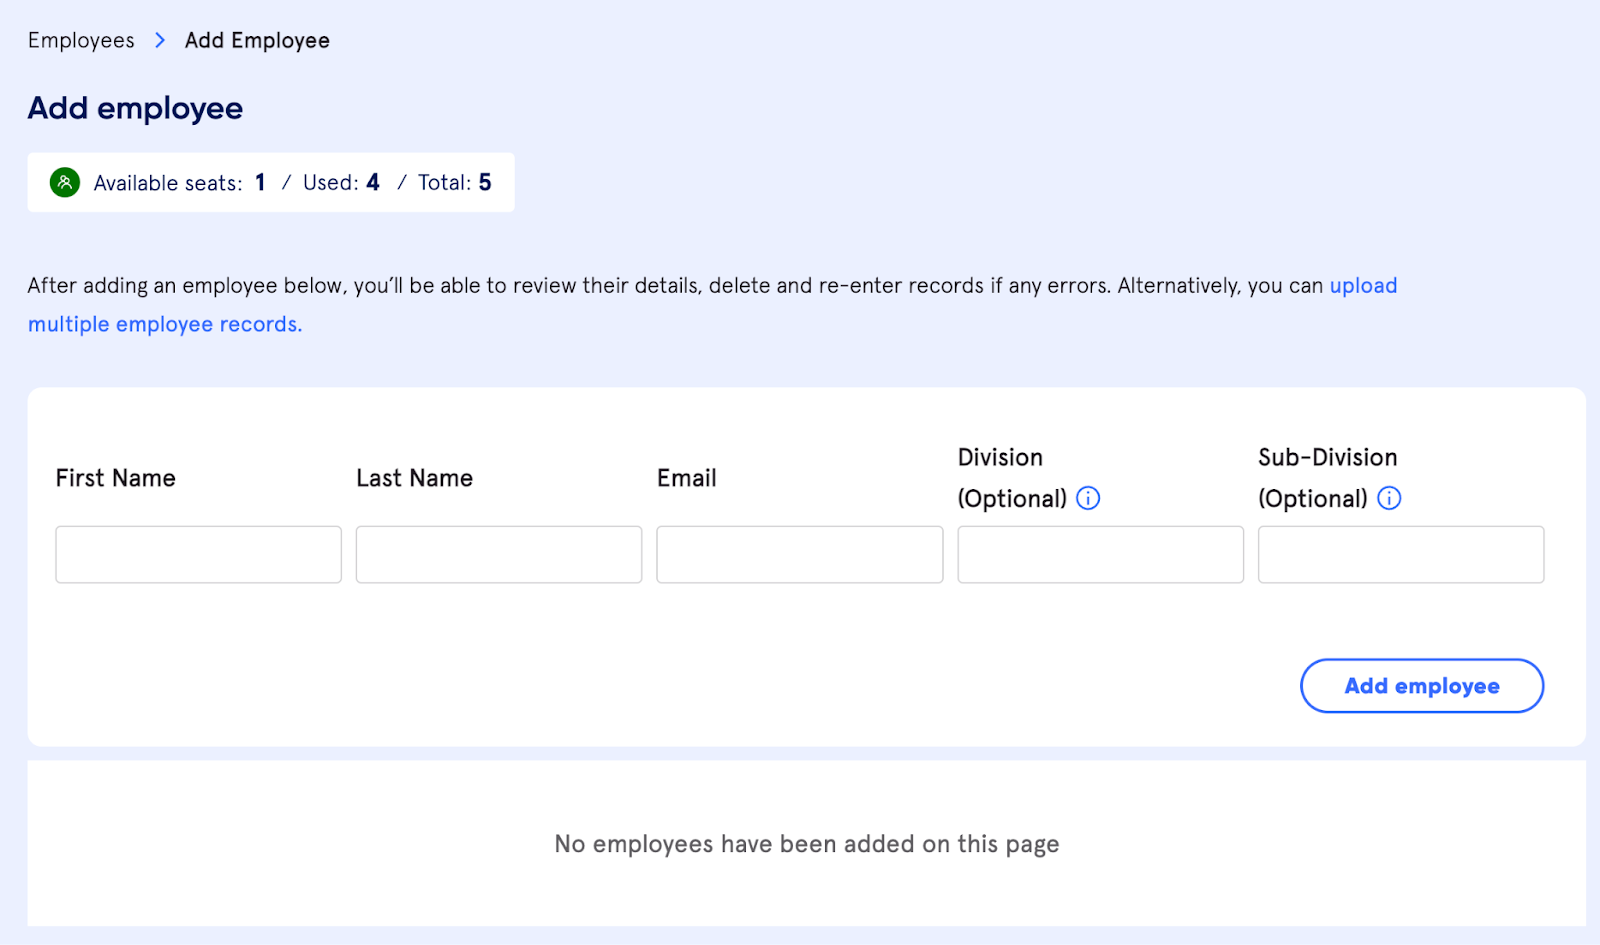
Enter employee data
First Name: This is used to create a member profile for your employee within the Sonder platform. This field is mandatory.
Last Name: This is used to create a member profile for your employee within the Sonder platform. This field is mandatory.
Email Address: This is used to create a member profile for your employee within the Sonder platform. This field is mandatory and must be unique for each employee.
The Portal will prevent an employee being created if an existing employee is using the same email address. This is to prevent duplicate employees existing in the platform.
Division: This value (e.g. Finance, People & Culture) is free-text and is used as a reporting dimension to provide you with more granular insights.
Sub-Division: This value (e.g. Accounts, Talent, Legal, Operations) is free-text and is used as a reporting dimension to provide you with more granular insights.
Once employee data has been successfully added, you can click ‘Add employee’ to finalise this process which will create and activate a Sonder member profile for this employee.
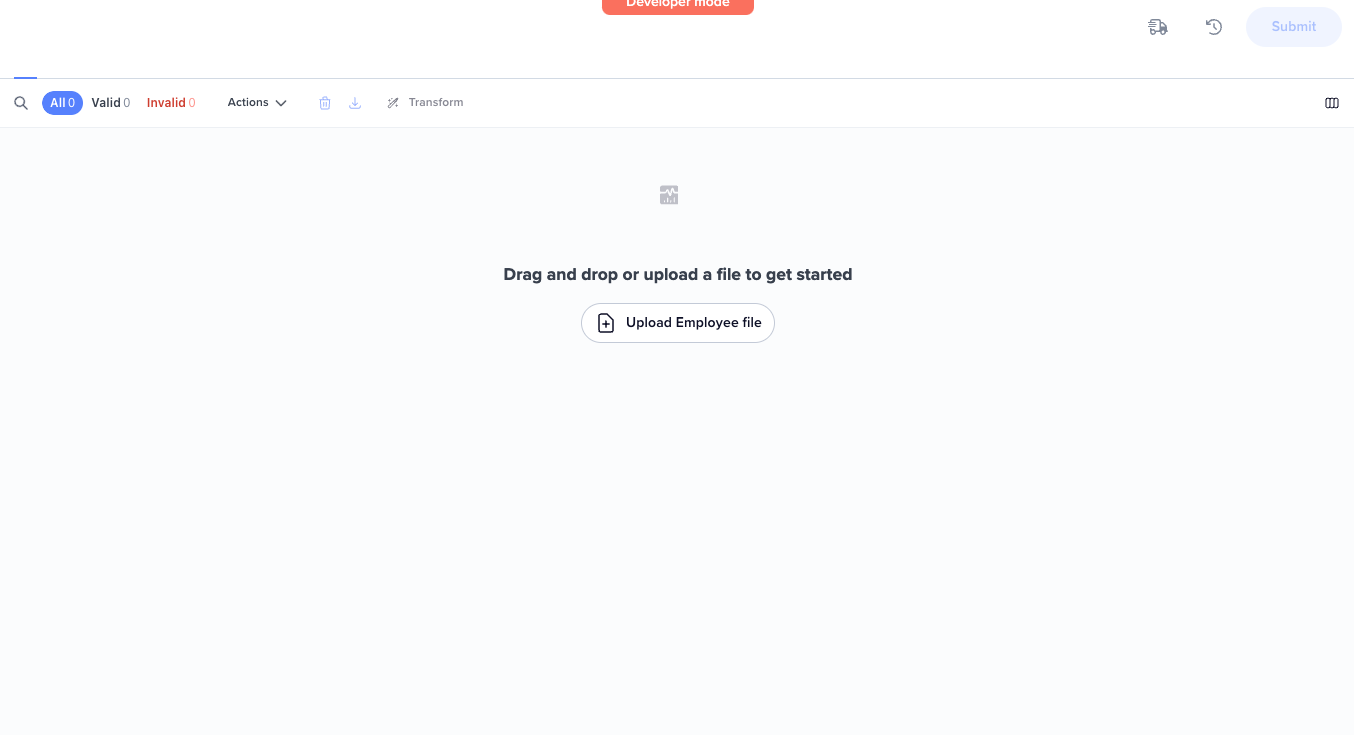
Bulk add employees
To add multiple employees through a file upload, select the ‘Bulk add employees’ option from the Manage Employees dropdown menu in the Employees area.
1. Preparing your employee data
Start by considering where your employee data is located and the volume of new employees you want to add as part of the process. There are two ways to prepare your data for upload:
Using the template: Click on the ‘Download CSV template’ link on screen to view and edit the CSV template that has been provided.Using your own file: You may prefer to export your employee data from another platform (i.e. HRIS System) into a file that you can use to upload into the Customer Portal. In this instance, please ensure that the file to be uploaded is in CSV or XLSX format.
The following employee fields/data can be uploaded to the Customer Portal:
First Name: This is used to create a member profile for your employee within the Sonder platform. This field is mandatory.
Last Name: This is used to create a member profile for your employee within the Sonder platform. This field is mandatory.
Email Address: This is used to create a member profile for your employee within the Sonder platform. This field is mandatory and must be unique for each employee.
The Customer Portal will prevent an employee being created if an existing employee is using the same email address. This is to prevent duplicate employees existing in the platform.
Division: This value (e.g. Finance, People & Culture) is free-text and is used as a reporting dimension to provide you with more granular insights.
Sub-Division: This value (e.g. Accounts, Talent, Legal, Operations) is free-text and is used as a reporting dimension to provide you with more granular insights.
|
🤔 Checking Column Headers To streamline the data upload process, we recommend reviewing the Column Headers in your file to ensure they align and match with each field shown above (e.g. First Name, Last Name, Email Address). You can also compare the columns in your file to the CSV template that we have provided. |
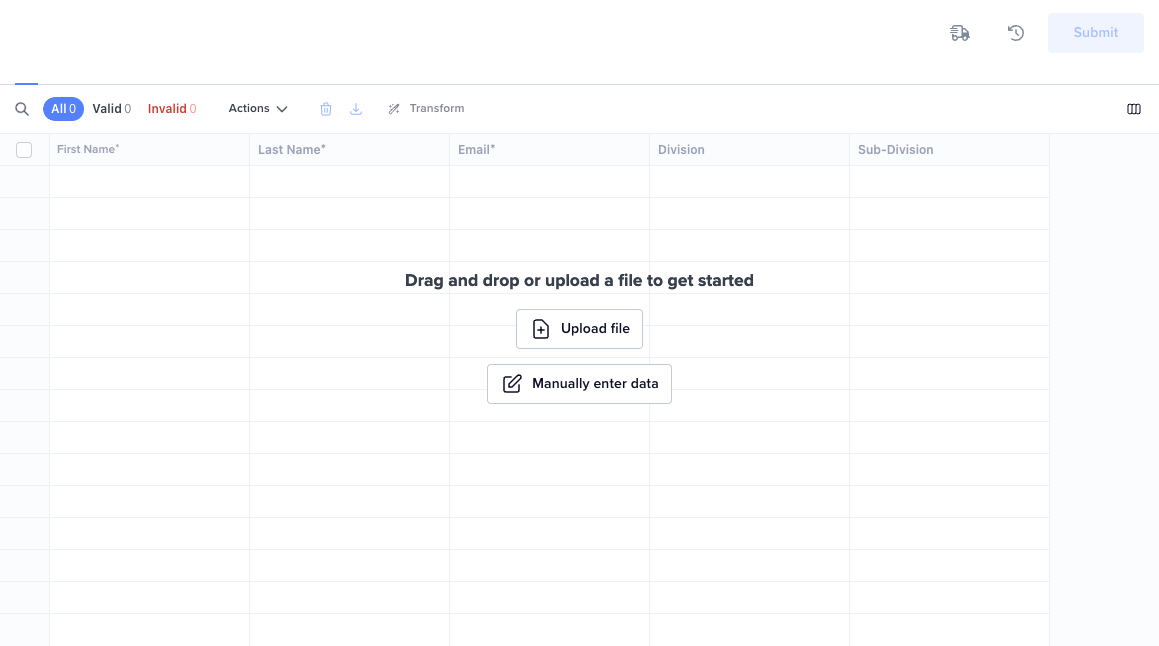
2. Uploading your employee data
Once you have your file ready to upload, you can simply drag and drop it into the designated area or click on ‘Upload file’ to locate and select the file from your computer. The upload process will take several seconds to complete and once finished will automatically transition you to the next step in the process.
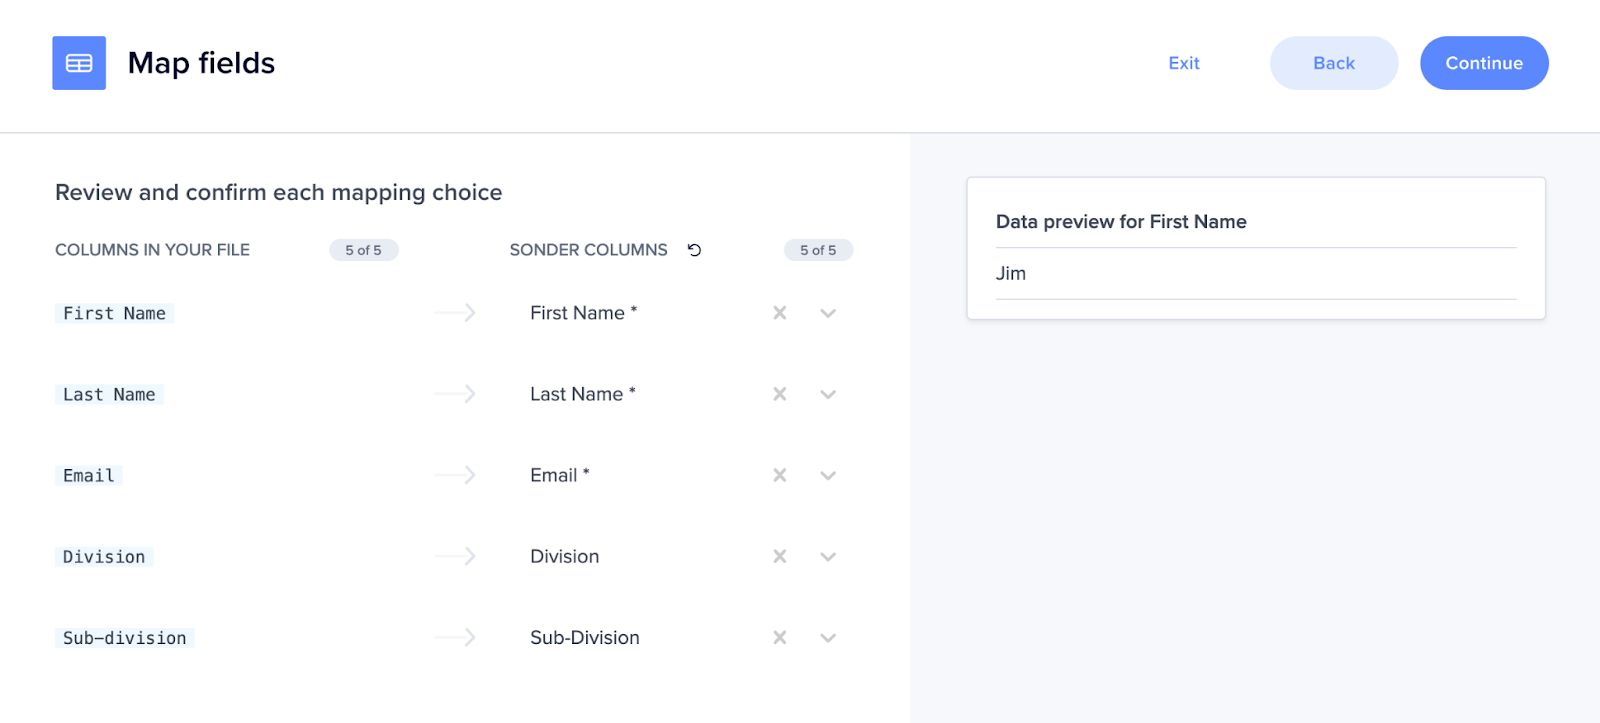
3. Mapping your columns to fields in the Customer Portal
This step is crucial to the data upload process, as it confirms alignment between the columns in your uploaded file with the fields that exist within the Customer Portal.
For each ‘Column in Your File’ shown on the left, a corresponding selection should be made in the ‘Sonder Columns’ on the right. If you observe an incorrect mapping or manual input is required, you can select the correct field mapping by accessing the dropdown menu shown beside the destination fields.
In order to proceed, all mandatory fields (highlighted with *) are required to have mapping selected. Mapping additional fields (e.g. Division, Sub-division) is recommended where practical as it will result in more granular reporting and insights for your organisation later.
Once you are confident that the fields in your file are successfully mapped, you can click on the Continue button to proceed.

|
🤔 Using the Data Preview Pane Hovering over a field will reveal the data preview pane on the right hand side which can be used to view sample data and confirm columns and fields are mapped correctly. |
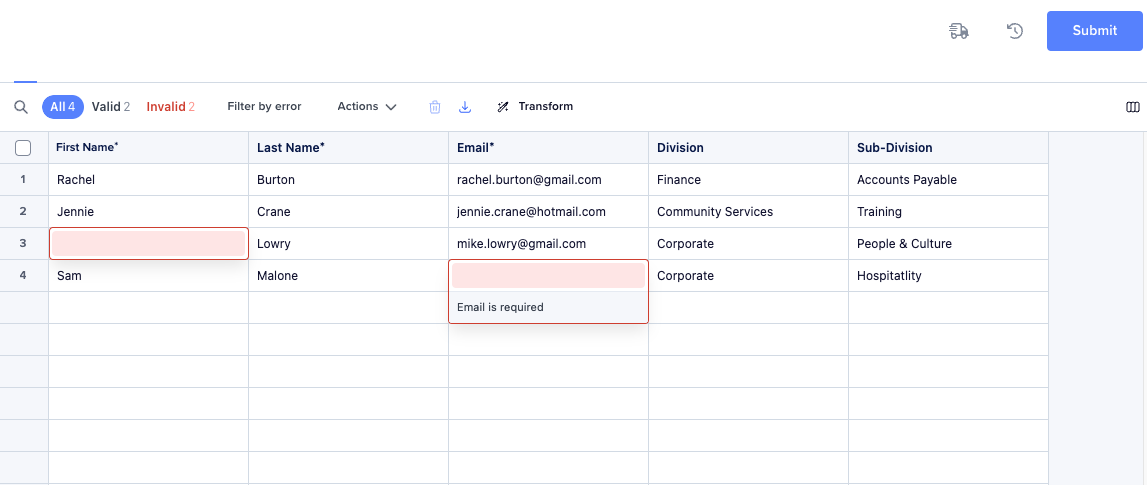
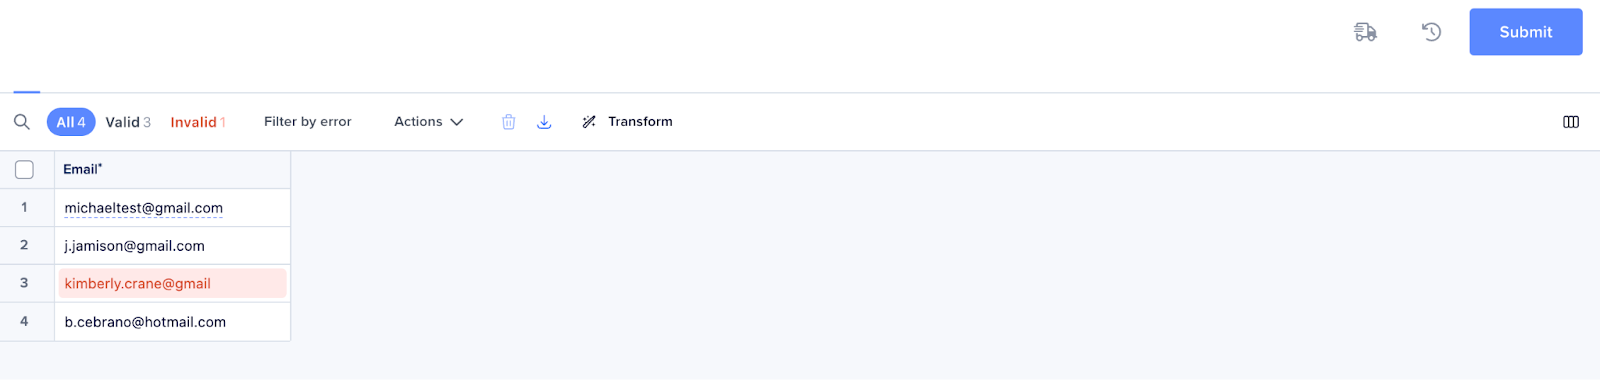
4. Data validation and correction
This step of the process will allow you to review your data, make changes and correct errors (highlighted in red) prior to it being uploaded. Common errors to be resolved at this stage include:
Missing Mandatory Fields: All employees require a First Name, Last Name and Email Address to be provided in order for their member profile to be created.
Invalid Email Address: All employees require a valid email address and this value must be unique in order for the member profile to be created successfully.
Duplicate Email Addresses: All employees require a unique email address to have a member profile created. If we identify employees in your file that have the same email address, these records will be highlighted in the data table.
Hovering over error messages can be useful in determining the cause of a specific error (see below).
Changes to employee records can be made directly in the data table which will automatically change colour when errors have been successfully resolved.
Once you have successfully resolved outstanding data errors in your file you can click on the Submit button to proceed.
|
🤔 Using the Data Preview Pane For larger files, the filters at the top of the page (e.g. Invalid) can be used to indicate the number of records with errors and also help filter the list to only highlight records that require attention. |
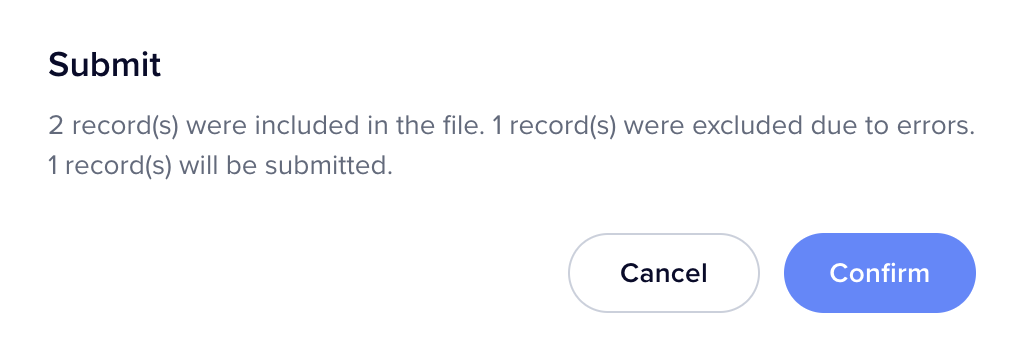
5. Submitting your employee data
The pre-submission dialog (presented each time you submit a file) indicates the total records in your file, the number of employee records that contain errors, and the total number of valid records that will be submitted.
In the instance that your file contains more employee records than the total number of available seats, then this will also be indicated in the pre-submission dialog.

Cancel: Selecting this option will close the dialog and allow you to return to the data grid to resolve outstanding errors.
Confirm: Selecting this option will allow you to submit your file to Sonder and create member profiles for new and valid employee records you have provided. All employee records that are discarded at this point will be retrievable at the end of the process.
The following screen will be presented when you click on the Confirm button to proceed:

The following screen will be presented when the submission process has been completed successfully:

|
😩 What happens if I exceed my Available Seat Count? If the number of employees in your file exceeds the available seat count, the file will continue to be processed as expected, however each additional member above the seat count will be flagged with an error and rejected. All employee records that are discarded due to quota limitations can be reviewed and downloaded. Please contact your Customer Success Manager to discuss increasing your Total Seat Count. |
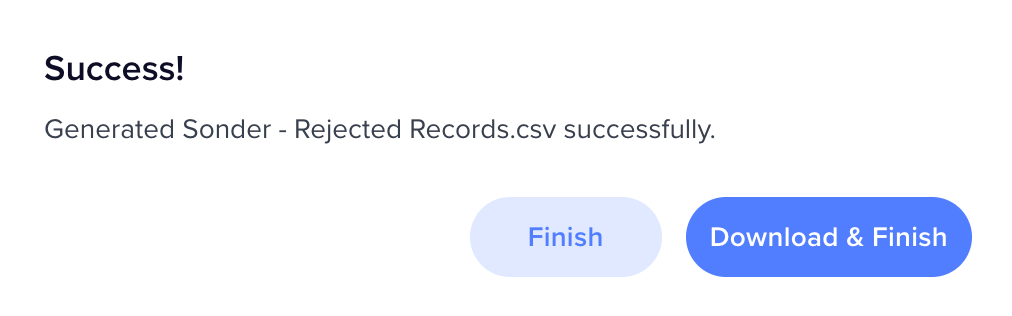
6. Retrieving your discarded employee records
Once your file has been successfully submitted for processing, if there were any employee records that were discarded as part of the process, then you will see the following dialog displayed:

Clicking on ‘Download & Finish’ will allow you to view and download a list of all discarded employee records as a CSV file. The file will also contain further information about why each record was rejected, which can be used to rectify errors in the file and re-submit the employee data again.
|
🙋 Downloading Discarded Employee Records Before navigating away or closing this dialog, we recommend always downloading the CSV extract of discarded employee records. This is the only time that the list of discarded employees will be available. |
Common reasons on why employee records are discarded include:
Invalid or Duplicate Records: Employee records with errors that were left unresolved earlier in the process will be discarded.
Quota Exceeded: If the number of employees in your file exceeds the available seat count, then only a portion of the employees in your file will be successfully uploaded. Each additional employee above the seat count will be flagged with an error and discarded.
Please contact your Customer Success Manager to discuss increasing your Total Seat Count.
Access to the Sonder service
Once a member profile has been created for your employee, they will have immediate access to the Sonder service. There are several ways that a member can access the Sonder service:
- Logging into the Sonder App: The member logs into the Sonder app with their email address, sets a password and completes the email verification process. Once this is complete they can then login, complete their profile and access the Sonder service.
- Welcome Email: The member is sent a welcome email with a link they can use to login, complete their profile and access the Sonder service.
- Employee Email Address: If your company is configured to use Single Sign-On, then your employee will be able to use their company email and password to login, complete their profile and access the Sonder service.
Activation communications to members
|
🤓 What are Automated Activation Communications? Activation communications are a series of engaging and informative emails that are sent to new members that introduce the benefits and key features of the Sonder service and how they can be accessed via the Sonder mobile application. The first activation communication is sent automatically to new members at launch and (if enabled) additional communications are sent weekly for 6 weeks. We highly recommend the use of these automated communications to ensure your employees are getting the most out of the Sonder service. |
When a member profile is created within the Customer Portal, your company configuration will determine if and when outgoing activation communications are sent to members.
Example: Initial ‘welcome email’ that is sent to new members

Activation Communications (at Sonder Launch): When enabled, a ‘welcome email’ will be sent to all members with an active profile that have not yet activated the Sonder service. This communication will be sent once, on a day and time provided by you (the customer) and agreed to with your Customer Success Manager.
Activation Communications (Ongoing): When enabled, all new employees that are added via the Portal over the last 24 hours (and have not activated the Sonder service) will receive a ‘welcome email’ notifying them of the Sonder service and how they can activate their account. This email will be sent the following morning at 10:30am based on the region/time-zone configured for your organisation.
No Activation Communications: With activation communications disabled, it is the customer’s responsibility to communicate to employees when and how they can access the Sonder service to access support services.
Editing Employee Details
Employee details can be updated within the platform individually using ‘Edit details’ or in bulk using ‘Bulk edit employees’.
Edit employee details
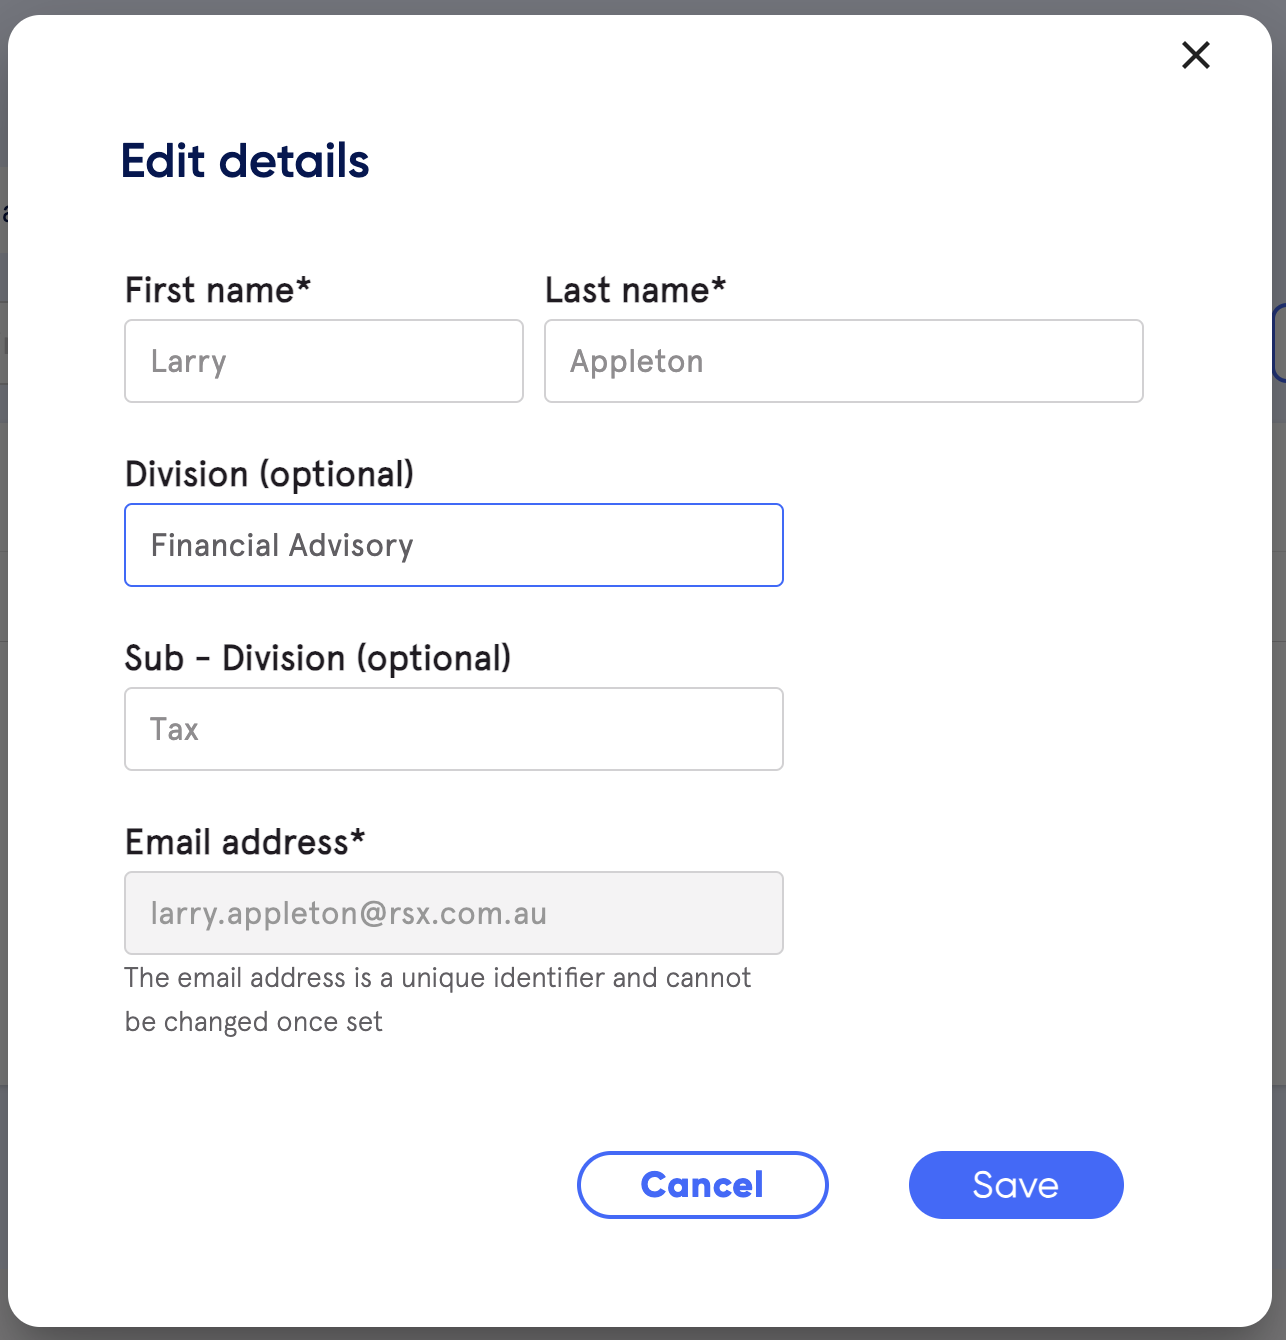
To edit the details of a single employee, navigate to the Employees area and click on theicon in the row that corresponds with that employee. The following screen will then be displayed:
Edit employee data
First Name & Last Name: Changes made to an employee's name will be reflected immediately within the Customer Portal (including Employee Search).
Division: Changes made to an employee division will be reflected immediately within the Customer Portal, but can take up to 48 hours to be reflected in reporting.
Sub-Division: Changes made to an employee sub-division will be reflected immediately within the Customer Portal, but can take up to 48 hours to be reflected in reporting.
Email Address: The employee email address is used as a unique identifier within the Sonder platform and cannot be edited via the Customer Portal. If you require a change to be made to this field please contact your Customer Success Manager for further assistance.
Bulk edit employee details
To edit multiple employees through a file upload, select the ‘Bulk edit employees’ option from the Manage Employees dropdown menu in the Employees area.
1. Preparing your employee data
Start by considering where your employee data is located and the volume of new employees you want to edit as part of the process. There are two ways to prepare your data for upload:
- Using the template: Click on the ‘Download CSV template’ link on screen to view and edit the CSV template that has been provided.
- Using your own file: You may prefer to export your employee data from another platform (i.e. HRIS System) into a file that you can use to upload into the Customer Portal. In this instance, please ensure that the file to be uploaded is in CSV or XLSX format.
The following employee fields/data can be edited within the Customer Portal:
First Name & Last Name: Changes made to an employee's name will be reflected immediately within the Customer Portal (including Employee Search).
Division: Changes made to an employee division will be reflected immediately within the Customer Portal, but can take up to 48 hours to be reflected in reporting.
Sub-Division: Changes made to an employee sub-division will be reflected immediately within the Customer Portal, but can take up to 48 hours to be reflected in reporting.
|
🙋 Employee Email Addresses Including the employee’s email address in the file you upload is essential as it is used as a unique identifier within the Sonder platform and helps determine which employee record will be updated. The email cannot be updated via the Customer Portal, however if you require a change to be made to this please contact your Customer Success Manager for further assistance. |
2. Uploading your employee data
Once you have your file ready to upload, you can simply drag and drop it into the designated area or click on ‘Select file’ to locate and select the file from your computer.

3. Mapping your columns to fields in the Customer Portal
This step is crucial to the data upload process, as it confirms alignment between the columns in your uploaded file with the fields that exist within the Customer Portal.
For each ‘Column in Your File’ shown on the left, a corresponding selection should be made in the ‘Sonder Columns’ on the right. If you observe an incorrect mapping or manual input is required, you can select the correct field mapping by accessing the dropdown menu shown beside the destination fields.
In order to proceed, all mandatory fields (highlighted with *) are required to have mapping selected. Mapping additional fields (e.g. Division, Sub-division) is recommended where practical as it will result in more granular reporting and insights for you later.
Once you are confident that the fields in your file are successfully mapped, you can click on the Continue button to proceed.

|
🤔 Using the Data Preview Pane Hovering over a field will reveal the data preview pane on the right hand side which can be used to view sample data and confirm columns and fields are mapped correctly. |
4. Data validation and correction
This step of the process will allow you to review your data, make changes and correct errors (highlighted in red) prior to it being uploaded. Common errors to be resolved at this stage include:
Missing Mandatory Fields: All employees require a First Name, Last Name and Email Address to be provided in order for their member profile to be edited.
Duplicate Email Addresses: All employees require a unique email address to have a member profile edited. If we identify employees in your file that have the same email address, these records will be highlighted in the data table.
Hovering over error messages (shown below) can be useful in determining the cause of a specific error. Changes to employee records can be made directly in the data table which will automatically change colour when errors have been successfully resolved.
Once you have successfully resolved errors in your file you can click on the Submit button to proceed.
|
🤔Uploading New Employee Data using Bulk Edit Employees In the instance that the file upload includes new employee data (i.e. the email address for an employee does not match an existing employee in the Customer Portal) then this record will be discarded as part of the bulk edit employees process. |
5. Submitting your employee data
The pre-submission dialog (presented each time you submit a file) indicates the total records in your file, the number of employee records that contain errors, and the total number of valid records that will be submitted.
In the instance that your file contains more employee records than the total number of available seats, then this will also be indicated in the pre-submission dialog.
Cancel: Selecting this option will close the dialog and allow you to return to the data grid to resolve outstanding errors.
Confirm: Selecting this option will allow you to submit your file to Sonder and edit member profiles for valid employee records you have provided. All employee records that are discarded at this point will be retrievable at the end of the process.
The following screen will be presented when you click on the Confirm button to proceed:
The following screen will be presented when the submission process has been completed successfully:
|
😩 What happens if I exceed my Available Seat Count? If the number of employees in your file exceeds the available seat count, the file will continue to be processed as expected, however each additional member above the seat count will be flagged with an error and rejected. All employee records that are discarded due to quota limitations can be reviewed and downloaded. |
6. Retrieving your discarded employee records
Once your file has been successfully submitted for processing, if there were any employee records that were discarded as part of the process, then you will see the following dialog displayed:
Clicking on ‘Download rejected records file’ will allow you to view and download a list of all discarded employee records as a CSV file. The file will also contain further information about why each record was rejected, which can be used to rectify errors in the file and re-submit the employee data again.
|
🙋 Downloading Discarded Employee Records Before navigating away or closing this dialog, we recommend always downloading the CSV extract of discarded employee records. This is the only time that the list of discarded employees will be available. |
Common reasons on why employee records are discarded include:
Invalid or Duplicate Records: Employee records with errors that were left unresolved earlier in the process will be discarded.
Quota Exceeded: If the number of employees in your file exceeds the available seat count, then only a portion of the employees in your file will be successfully uploaded. Each additional employee above the seat count will be flagged with an error and discarded.
Please contact your Customer Success Manager to discuss increasing your Total Seat Count.
Deleting Employees
Employee access to the Sonder service can be removed individually by deleting an individual employee or in bulk by using ‘Bulk delete employees’.
Delete one employee
To delete a single employee , navigate to the Employees area and click on the icon in the row that corresponds with that employee.
The following screen will then be displayed:
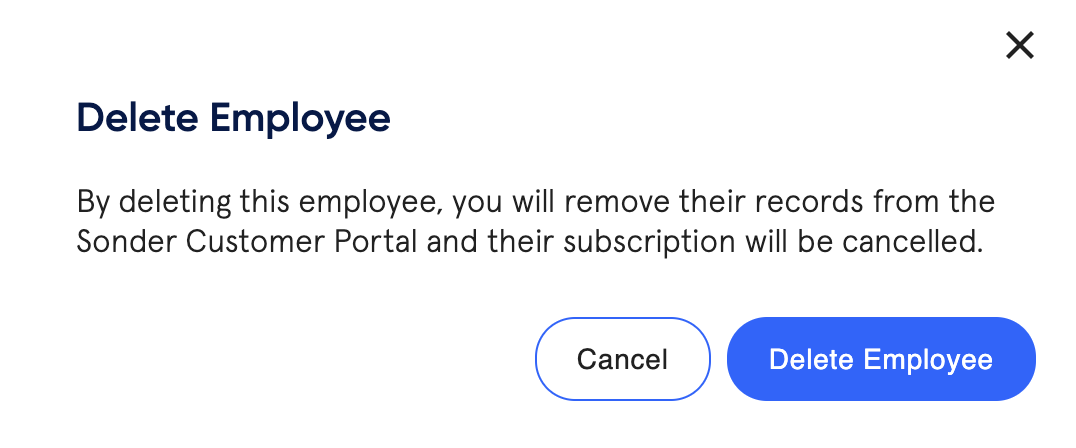
Cancel: Selecting this option will close the dialog and allow you to return to the employee list without deleting this employee.
Delete Employee: Selecting this option will remove this employee from the list, and update your organisations Available and Used Seats accordingly.
|
🙋 Do deleted employees lose access to the Sonder service immediately? Once an employee is deleted, they will continue to have access to the Sonder app and services for a 30 day ‘grace’ period before their access is revoked. |
Bulk delete employees
To delete multiple employees through a file upload, select the ‘Bulk delete employees’ option from the Manage Employees dropdown menu in the Employees area.
1. Preparing your employee data
Start by considering which employees you would like to delete and prepare a file with a single column that contains a list of email addresses that correspond to these employees.
You may prefer to export your employee data from another platform (i.e. HRIS System) into a file that you can use to upload into the Customer Portal. In this instance, please ensure that the file to be uploaded is in CSV or XLSX format.
2. Uploading your employee data
Once you have your file ready to upload, you can simply drag and drop it into the designated area or click on ‘Upload file’ and locate and select the file from your computer.
3. Mapping your columns to fields in the Customer Portal
This step in the data upload process confirms alignment between the columns in your uploaded file with the fields that exist within the Customer Portal.
When deleting employees in bulk, only a single field is required to be mapped and this is the employee’s Email Address.
In order to proceed, ensure that the field that includes employee email addresses in ‘Columns in Your File’ on the left corresponds with the Email field in the ‘Sonder Columns’ on the right. If you observe an incorrect mapping or manual input is required, you can select the correct field mapping by accessing the dropdown menu shown beside the destination fields.
Once you are confident that the Email field in your file is successfully mapped, you can click on the Continue button to proceed.
4. Data validation and correction
This step of the process will allow you to review your data, make changes and correct errors (highlighted in red) prior to it being uploaded. Common errors to be resolved at this stage include:
Invalid Email Address: All employees to be deleted require a valid email address.
Duplicate Email Addresses: All employees require a unique email address so they can be removed successfully. If we identify employees in your file that have the same email address, these records will be highlighted in the data table.
Hovering over error messages can be useful in determining the cause of a specific error (see below).
Changes to employee records can be made directly in the data table which will automatically change colour when errors have been successfully resolved.
Once you have successfully resolved outstanding data errors in your file you can click on the Submit button to proceed.
5. Submitting your employee data
The pre-submission dialog (presented each time you submit a file) indicates the total records in your file, the number of employee records that contain errors, and the total number of valid records that will be submitted for deletion.

Cancel: Selecting this option will close the dialog and allow you to return to the data grid to resolve outstanding errors.
Confirm: Selecting this option will allow you to submit your file to Sonder which will trigger member profiles to be deleted for employees based on the email address provided. All employee records that are discarded at this point due to errors will be retrievable at the end of the process.
The following screen will be presented when you click on the Confirm button to proceed:
The following screen will be presented when the submission process has been completed successfully: